UPDATE 2017: All Skookum Monkey hosting accounts now come with AutoSSL. If you installed WordPress before 2017, read this tutorial about how to add SSL to WordPress.
At the beginning of this year, we announced that free SSL certificates were available for all Skookum Monkey hosting accounts upon request. Now, you can install a free Let’s Encrypt SSL certificate on your own via cPanel. This is available to all Skookum Monkey hosting clients. No more need to submit an install request, unless of course you need help.
Once upon a time, you needed a dedicated IP address in order to use an SSL certificate. Thanks to rapid changes in technology, Google favouring sites with SSL certificates, and Let’s Encrypt’s mission to make the entire web 100% HTTPS, making your site secure is now really simple.
Let’s Encrypt is highly trusted, with sponsors including Mozilla, Automattic (WordPress), Cisco, and more. It’s also free and has automatic renewals.
Below are the instructions to install your own Let’s Encrypt SSL certificate via cPanel, and how to make the necessary changes to WordPress if you already have WordPress installed.
How To Install Let’s Encrypt SSL Certificate via cPanel
1) Log in cPanel
2) In the security section, click “Let’s Encrypt”
3) Click “New SSL Certificate”.
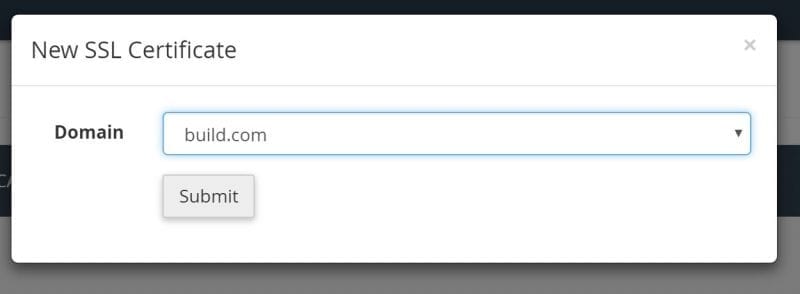
4) Choose the domain you want to install the Let’s Encrypt SSL certificate. You can install one certificate for each domain in your account. Repeat the necessary steps below for each account. You will get a “installation successful” message once it is done.
You’re done! Now, you need to make some changes to WordPress if you’ve already installed it.
How to Make the Necessary Changes to WordPress After Installing the Let’s Encrypt SSL Certificate
1) Login your WordPress dashboard and go to Settings – General.
2) In the General Settings tab, change the “WordPress Address (URL)” and “Site Address (URL)” fields from http:// to https://
3) Scroll down to the bottom and click, “Save Changes.”
4) Go to Plugins – Add New.
5) Search for “Really Simple SSL” and install it and activate.
6) A message will appear at the top of the screen. Click the “Go ahead, activate SSL!” button.
7) If you have Jetpack installed, you’ll need to go into “Plugins – Installed Plugins” and deactivate and reactivate it. Then you’ll have to go into Jetpack – Jetpack to reconnect Jetpack to your WordPress.com account. If you do not do this, Jetpack will no longer work.
You are almost there! If you installed WordPress via Softaculous, there is one more change you need to make.
How to Update Your Softaculous WordPress Installation After Installing the Let’s Encrypt SSL Certificate
1) Login to cPanel.
2) Go the Softaculous section in cPanel and click the WordPress icon.
3) Scroll down to the “Current Installations” section. Click the edit pencil beside the installation you want to update.
4) In the “Installation Details” section, edit the url from http:// to https://
5) Scroll down the bottom and click the “Save Installation Details” button.
And now you are done!
Repeat the above for every site to which you want to add a Let’s Encrypt SSL certificate. We strongly recommend that you do it for all of your sites that are hosted with Skookum Monkey.
As always, if the above seems daunting to you, just send us an email and we’d be happy to install the certificate for you!
If you are not already hosting your website with Skookum Monkey, there are other benefits that come with choosing to host us.


